Gutters help keep your roof and foundation safe from damage, as well as preventing costly flooding and soil erosion.
Choosing the right gutters and installing them correctly is crucial for protecting your home. Here are some tips on how to get the job done. This includes ensuring a smooth installation with proper slope to channel water properly. Contact Gutter Installation Gainesville FL for professional help.
Gutters are your home’s first line of defense against water damage, so it is important to make sure they are properly installed and suited for your needs. Choosing the right material, style, and size will ensure they function properly, reduce your risk of leaks, and enhance the aesthetics of your home’s exterior. It is also important to consider your region’s climate when making a gutter choice, as this will help you determine the type of material and profile that will best handle local rainfall patterns.
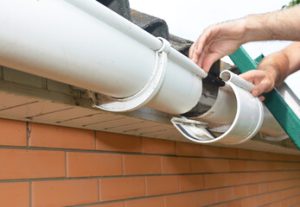
Aluminum gutters are a popular option for homeowners because they are lightweight, rust-resistant, and require minimal maintenance. They are available in 5″ and 6″ widths to accommodate different roof lines, and they can be installed on both sides of your roof for maximum water runoff efficiency. They can also be fitted with built-in leaf guards to prevent clogging and overflow.
Another consideration is the type of downspouts, as these are crucial for directing water away from your foundation and basement. Ideally, they should be placed every 30 feet along the gutter line and at each corner of your home. It is also a good idea to have downspout extensions and splash blocks to help redirect water flow and protect your home’s foundation.
Once you have selected the material and style of gutters that are right for your home, it is essential to establish a regular maintenance routine. This includes regularly cleaning out leaves and debris, as well as ensuring the downspouts are free of clogs. These simple tasks can help you avoid expensive repair bills and extend the lifespan of your gutters.
When it comes to installing gutters, professional installation is always the safer and more reliable option. It can be difficult and dangerous to try to install gutters yourself, especially if you do not have the proper equipment or skill level. Hiring a professional will save you time and money in the long run, as it will also protect your home from costly repairs. The most experienced installers offer a range of services to meet your unique requirements and can provide a warranty to give you peace of mind.
Preparing the Area
Gutter installation is a fairly easy home improvement project, but it can still be challenging for inexperienced homeowners. The process requires accurate measurements, precise cuts and the correct materials based on your roof’s design, local weather conditions and other factors. Without proper preparation, the job can be frustrating and time-consuming. Thankfully, there are some ways to make the task easier and ensure a professional-grade finished product.
Preparing for gutter installation involves clearing the area of debris and ensuring the gutters have the right slope for effective water drainage. A gutter system that’s not pitched properly can cause clogs and structural damage over time. Using a level and carefully marking the slope of each gutter run is essential. Adding gutter hangers as needed is also important for proper support and a secure attachment.
Another critical factor in preparing for gutter installation is checking the soffits and fascia boards for signs of moisture, mildew or rotting wood. This is a great opportunity to take care of other maintenance tasks as well, such as replacing damaged boards.
Once the soffits and fascia are prepared, it’s time to install the gutters themselves. First, a layer of sealant or caulk should be applied to the seams and joints. This will protect the gutters from leaks and help them last longer. Next, a gutter hanger should be installed at each end of the gutter run. Once the gutters are in place, the slope should be checked again with a level to make sure it’s even and pitching correctly.
Once the gutters are in place, downspouts can be added to the system to direct water flow away from your home. Downspout outlets should be placed at each end of the gutter run and secured with screws to ensure a waterproof seal. Once the downspouts are fastened, a check for leaks should be made. If there are any leaks, they should be repaired immediately to prevent further damage to the home and landscaping. Keeping up with these steps will help ensure a successful DIY gutter installation. If you’re not comfortable tackling this project on your own, it’s always best to hire a professional to get the job done right.
Hanging the Gutters
Gutter systems play a key role in protecting your home’s foundation, siding, windows, and landscaping from water damage. They funnel rainwater away from your structure and into the street or storm sewer system, avoiding basement flooding, soil erosion, and foundation cracking. However, a gutter system is only as effective as it’s correctly installed and regularly maintained. A poorly functioning gutter system can lead to clogging, leaks, and overflowing.
Before installing your gutters, take the time to plan and measure your roofline. This will help you determine the correct gutter size and placement of downspouts. You’ll also need to decide on a gutter material. Aluminum is light and rust-resistant, while vinyl is inexpensive but not as durable. Copper is expensive but looks good and lasts for decades. Once you’ve made your decisions, gather the necessary materials for installation, including gutter sections, downspout sections, connectors, and end caps.
Aim for a slight slope from the roof to the downspouts. This will ensure that your gutters drain properly and prevent sagging and overflowing during heavy rains or snowfalls. Mark this gradual angle with a chalk line along your fascia boards and carefully cut your gutters to size using tin snips or a hacksaw. Dry-fit each piece to check for proper alignment and fit before securing it with corrosion-resistant screws or nails.
Attach gutter hangers to your roofline at regular intervals, depending on the material you’re using and local weather conditions. Typically, you’ll want to space them every three feet, but closer spacing may be necessary in areas prone to heavy rain or snowfall.
After attaching the hangers, install the gutters by inserting them into the brackets and screwing or nailing them in place. Be sure to apply a high-quality waterproof sealant around all seams and joints, following the manufacturer’s instructions for drying and application.
Once the gutters are fully installed, test them by running a garden hose through the downspouts. If the water flows smoothly and doesn’t pool or spill over the edges, your gutter system is working well. If you notice any leaks, make repairs as needed and test the system again. Regular maintenance, such as removing leaves, pine needles, shingle grit, and twigs from the gutter system, is also critical to preventing clogging and maintaining optimal performance.
Attaching the Downspouts
Downspouts are the critical link between gutters and your home. They collect rainwater, direct it away from the house, and help to keep your foundation, siding, landscaping, and basement safe from water damage over time. Installing a properly functioning gutter and downspout system is essential for the longevity of your roof, structure, and yard.
During the installation process, it is important to plan ahead and gather all of the necessary materials. Before starting, it is helpful to have a tape measure to make precise measurements and a tool like a hacksaw or tin snips to cut the gutter pieces. A drill and sheet metal screws are also needed to connect the gutter sections.
Once you’ve gathered all of your supplies, it is time to start the actual installation. Begin by measuring the length of each fascia along the roofline. You will want to add about a foot for overlap in each section. Next, calculate the number of downspouts you will need. The recommendation is to have one downspout every 20 feet of gutter. Be sure to plan accordingly for where you want the downspouts to be located, as it is important that they are not directing water toward walkways or your foundation.
Attach the downspouts to the gutters using brackets. These will either snap on or be mounted into the face boards of the gutters. The end caps and downspout connectors should be installed as well, once again, using galvanized lag screws. Once everything is in place, test the downspouts with a hose to ensure that they are working correctly.
Downspout lines are an affordable and easy-to-install way to safeguard your home against water damage. They leverage gravity to drain the water over a wide area of dirt, rather than allowing it to pool around your foundation and into your basement or crawl space. With proper maintenance and regular testing, gutter downspouts will keep your home protected for years to come. To ensure your gutters are protected against debris and blockages, consider investing in a gutter guard. These are available at most hardware stores and can be easily installed on your existing gutters.